Monitor RabbitMQ and alert using Cloudwatch Alert
How to setup RabbitMQ and AWS to create an alert solution that listens on RabbitMQ metrics using Terraform
RabbitMQ is the technology that provides queuing solution to the system and may work like the orchestators to the workers that consume the queue, thus it is at most important to integrate a monitoring and alerting system for this crucial Queuing service.
Prerequistes
You should already have a running RabbitMQ server on your system and can be accessed from AWS If not, you can follow the tutorial I made for install RabbitMQ on EC2(CentOS) here. For other OSes, you can visit this link. https://www.rabbitmq.com/ec2.html
Install RabbitMQ on EC2 Amazon Linux
- First, you will need to install Erlang https://www.rabbitmq.com/which-erlang.html
- Run the command bellow to add the signing keys of the repositories of Erlang and RabbitMQ
- Remember to run this with
sudoprefix if needed. - Alternatively, run this command to switch to
rootshell
sudo su -
## primary RabbitMQ signing key
rpm --import https://github.com/rabbitmq/signing-keys/releases/download/2.0/rabbitmq-release-signing-key.asc
## modern Erlang repository
rpm --import 'https://dl.cloudsmith.io/public/rabbitmq/rabbitmq-erlang/gpg.E495BB49CC4BBE5B.key'
## RabbitMQ server repository
rpm --import 'https://dl.cloudsmith.io/public/rabbitmq/rabbitmq-server/gpg.9F4587F226208342.key'
- Then create a
rabbitmq.repoinside folder/etc/yum.repos.dto add Yum repositories for RabbitMQ and Erlang.
sudo nano /etc/yum.repos.d/rabbitmq.repo
- Then add this content to add the repositories
[modern-erlang]
name=modern-erlang-el9
# uses a Cloudsmith mirror @ yum1.novemberain.com.
# Unlike Cloudsmith, it does not have traffic quotas
baseurl=https://yum1.novemberain.com/erlang/el/9/$basearch
repo_gpgcheck=1
enabled=1
gpgkey=https://dl.cloudsmith.io/public/rabbitmq/rabbitmq-erlang/gpg.E495BB49CC4BBE5B.key
gpgcheck=1
sslverify=1
sslcacert=/etc/pki/tls/certs/ca-bundle.crt
metadata_expire=300
pkg_gpgcheck=1
autorefresh=1
type=rpm-md

[modern-erlang-noarch]
name=modern-erlang-el9-noarch
# uses a Cloudsmith mirror @ yum1.novemberain.com.
# Unlike Cloudsmith, it does not have traffic quotas
baseurl=https://yum1.novemberain.com/erlang/el/9/noarch
repo_gpgcheck=1
enabled=1
gpgkey=https://dl.cloudsmith.io/public/rabbitmq/rabbitmq-erlang/gpg.E495BB49CC4BBE5B.key
       https://github.com/rabbitmq/signing-keys/releases/download/2.0/rabbitmq-release-signing-key.asc
gpgcheck=1
sslverify=1
sslcacert=/etc/pki/tls/certs/ca-bundle.crt
metadata_expire=300
pkg_gpgcheck=1
autorefresh=1
type=rpm-md

[modern-erlang-source]
name=modern-erlang-el9-source
# uses a Cloudsmith mirror @ yum1.novemberain.com.
# Unlike Cloudsmith, it does not have traffic quotas
baseurl=https://yum1.novemberain.com/erlang/el/9/SRPMS
repo_gpgcheck=1
enabled=1
gpgkey=https://dl.cloudsmith.io/public/rabbitmq/rabbitmq-erlang/gpg.E495BB49CC4BBE5B.key
       https://github.com/rabbitmq/signing-keys/releases/download/2.0/rabbitmq-release-signing-key.asc
gpgcheck=1
sslverify=1
sslcacert=/etc/pki/tls/certs/ca-bundle.crt
metadata_expire=300
pkg_gpgcheck=1
autorefresh=1


##
## RabbitMQ Server
##

[rabbitmq-el9]
name=rabbitmq-el9
baseurl=https://yum1.novemberain.com/rabbitmq/el/9/$basearch
repo_gpgcheck=1
enabled=1
# Cloudsmith's repository key and RabbitMQ package signing key
gpgkey=https://dl.cloudsmith.io/public/rabbitmq/rabbitmq-server/gpg.9F4587F226208342.key
       https://github.com/rabbitmq/signing-keys/releases/download/2.0/rabbitmq-release-signing-key.asc
gpgcheck=1
sslverify=1
sslcacert=/etc/pki/tls/certs/ca-bundle.crt
metadata_expire=300
pkg_gpgcheck=1
autorefresh=1
type=rpm-md

[rabbitmq-el9-noarch]
name=rabbitmq-el9-noarch
baseurl=https://yum1.novemberain.com/rabbitmq/el/9/noarch
repo_gpgcheck=1
enabled=1
# Cloudsmith's repository key and RabbitMQ package signing key
gpgkey=https://dl.cloudsmith.io/public/rabbitmq/rabbitmq-server/gpg.9F4587F226208342.key
       https://github.com/rabbitmq/signing-keys/releases/download/2.0/rabbitmq-release-signing-key.asc
gpgcheck=1
sslverify=1
sslcacert=/etc/pki/tls/certs/ca-bundle.crt
metadata_expire=300
pkg_gpgcheck=1
autorefresh=1
type=rpm-md

[rabbitmq-el9-source]
name=rabbitmq-el9-source
baseurl=https://yum1.novemberain.com/rabbitmq/el/9/SRPMS
repo_gpgcheck=1
enabled=1
gpgkey=https://dl.cloudsmith.io/public/rabbitmq/rabbitmq-server/gpg.9F4587F226208342.key
gpgcheck=0
sslverify=1
sslcacert=/etc/pki/tls/certs/ca-bundle.crt
metadata_expire=300
pkg_gpgcheck=1
autorefresh=1
type=rpm-md
- Then run the command below to install RabbitMQ and Erlang
dnf update -y
dnf install socat logrotate -y
dnf install -y erlang-25.3.2.3 rabbitmq-server
- By default RabbitMQ service is turned off, turn on by running
systemctl start rabbitmq-server - Then to check for the status of RabbitMQ, run this it should show that RabbitMQ is running.
systemctl status rabbitmq-server
RabbitMQ Setup For Exporting to Cloudwatch
Install RabbitMQ Cloudwatch Exporter plugin
- To let Cloudwatch be able to alert, we will first need to export metrics from RabbitMQ. To do this, we can use a custom plugin called
RabbitMQ Cloudwatch Exporter - On your server,
cdto thepluginfolder of RabbitMQ then download all the files under theAssetstab in Release of this Github https://github.com/noxdafox/rabbitmq-cloudwatch-exporter/releases - The default path to the RabbitMQ's plugin folder vary between OSes, on Amazon Linux(CentOS,RHEL) it is
usr/lib/rabbitmq/lib/rabbitmq_server-3.12.2/plugins. Check out the default path for your OS here https://www.rabbitmq.com/relocate.html - The command below is for plugin version 1.0.4
cd /usr/lib/rabbitmq/lib/rabbitmq_server-3.12.2/plugins

## Download the plugin source code
curl -LO https://github.com/noxdafox/rabbitmq-cloudwatch-exporter/releases/download/v1.0.4/base16-1.0.0.ez
curl -LO https://github.com/noxdafox/rabbitmq-cloudwatch-exporter/releases/download/v1.0.4/certifi-2.5.2.ez
curl -LO https://github.com/noxdafox/rabbitmq-cloudwatch-exporter/releases/download/v1.0.4/eini-git.ez
curl -LO https://github.com/noxdafox/rabbitmq-cloudwatch-exporter/releases/download/v1.0.4/elixir-1.12.2.ez
curl -LO https://github.com/noxdafox/rabbitmq-cloudwatch-exporter/releases/download/v1.0.4/erlcloud-3.5.5.ez
curl -LO https://github.com/noxdafox/rabbitmq-cloudwatch-exporter/releases/download/v1.0.4/ex_aws-2.3.2.ez
curl -LO https://github.com/noxdafox/rabbitmq-cloudwatch-exporter/releases/download/v1.0.4/ex_aws_cloudwatch-2.0.4.ez
curl -LO https://github.com/noxdafox/rabbitmq-cloudwatch-exporter/releases/download/v1.0.4/hackney-1.16.0.ez
curl -LO https://github.com/noxdafox/rabbitmq-cloudwatch-exporter/releases/download/v1.0.4/idna-6.0.1.ez
curl -LO https://github.com/noxdafox/rabbitmq-cloudwatch-exporter/releases/download/v1.0.4/jason-1.3.0.ez
curl -LO https://github.com/noxdafox/rabbitmq-cloudwatch-exporter/releases/download/v1.0.4/jsx-3.1.0.ez
curl -LO https://github.com/noxdafox/rabbitmq-cloudwatch-exporter/releases/download/v1.0.4/lager-3.8.0.ez
curl -LO https://github.com/noxdafox/rabbitmq-cloudwatch-exporter/releases/download/v1.0.4/lager_cloudwatch-0.1.2.ez
curl -LO https://github.com/noxdafox/rabbitmq-cloudwatch-exporter/releases/download/v1.0.4/lhttpc-1.6.2.ez
curl -LO https://github.com/noxdafox/rabbitmq-cloudwatch-exporter/releases/download/v1.0.4/logger-1.12.2.ez
curl -LO https://github.com/noxdafox/rabbitmq-cloudwatch-exporter/releases/download/v1.0.4/metrics-1.0.1.ez
curl -LO https://github.com/noxdafox/rabbitmq-cloudwatch-exporter/releases/download/v1.0.4/mime-2.0.2.ez
curl -LO https://github.com/noxdafox/rabbitmq-cloudwatch-exporter/releases/download/v1.0.4/mimerl-1.2.0.ez
curl -LO https://github.com/noxdafox/rabbitmq-cloudwatch-exporter/releases/download/v1.0.4/parse_trans-3.3.0.ez
curl -LO https://github.com/noxdafox/rabbitmq-cloudwatch-exporter/releases/download/v1.0.4/rabbitmq_cloudwatch_exporter-1.0.4.ez
curl -LO https://github.com/noxdafox/rabbitmq-cloudwatch-exporter/releases/download/v1.0.4/singleton-1.2.0.ez
curl -LO https://github.com/noxdafox/rabbitmq-cloudwatch-exporter/releases/download/v1.0.4/ssl_verify_fun-1.1.6.ez
curl -LO https://github.com/noxdafox/rabbitmq-cloudwatch-exporter/releases/download/v1.0.4/telemetry-1.1.0.ez
curl -LO https://github.com/noxdafox/rabbitmq-cloudwatch-exporter/releases/download/v1.0.4/unicode_util_compat-0.5.0.ez
- When done, import the plugin to RabbitMQ by running, you may need to add
sudoprefix for permission. It should showstarted 4 pluginsalong with rabbitmq_cloudwatch_exporter.
rabbitmq-plugins enable rabbitmq_cloudwatch_exporter
Authentication option 1: Cloudwatch Authentication while hosting RabbitMQ on EC2 or as ECS task
- If your RabbitMQ is hosted on one the above providers, you won't need to set the environment variables
AWS_ACCESS_KEY_IDandAWS_SECRET_ACCESS_KEYbefore running. The plugin will automatically assume the instance role for authentication.
Authentication option 2: Cloudwatch Authentication while hosting RabbitMQ on an instance.
- In normal circumstance, the pluging will looks for value inside the env
AWS_ACCESS_KEY_IDandAWS_SECRET_ACCESS_KEYfor use in authentication to AWS. Set the env by open up your terminal then run
export AWS_ACCESS_KEY_ID=AKIAIOSFODNN7EXAMPLE
export AWS_SECRET_ACCESS_KEY= wJalrXUtnFEMI/K7MDENG/bPxRfiCYEXAMPLEKEY
- Alternatively, you can also add entries for the keys inside the file
rabbitmq.conf
cloudwatch_exporter.aws.access_key_id = "AKIAIOSFODNN7EXAMPLE"
cloudwatch_exporter.aws.secret_access_key = "wJalrXUtnFEMI/K7MDENG/bPxRfiCYEXAMPLEKEY"
Configure RabbitMQ metrics to send to Cloudwatch
- To update the configuration, we can make changes to the RabbitMQ config file.
- Like the default path of
pluginfolder, therabbitmq.conflocation depends on the OS RabbitMQ runs on. On Amazon Linux, it is inside/etc/rabbitmq/ - By default, the plugin will push all metrics to region
us-west-1. To change this behaviour, we can add this line into the config file
cloudwatch_exporter.aws.region = "us-east-2" - To exports metrics from all queue except server-named queues, add this entry to your
rabbitmq.conf
cloudwatch_exporter.aws.region = "us-east-2"
cloudwatch_exporter.metrics.queue.enable = true
# Exclude server-named queues
cloudwatch_exporter.metrics.queue.export_regex = "^(?!amq.gen-.*).*$"
- To find what other entries you can use to export metrics about the RabbitMQ Nodes, Exchanges... you can visit the plugin link here https://github.com/noxdafox/rabbitmq-cloudwatch-exporter#metrics
Restart RabbitMQ to apply new configuration
- Open up your terminal then run
systemctl restart rabbitmq-servier
Check for RabbitMQ Metrics
- If you have setup the plugin, Cloudwatch Metrics dashboard should start to show custom namespace called
RabbitMQwith these metrics
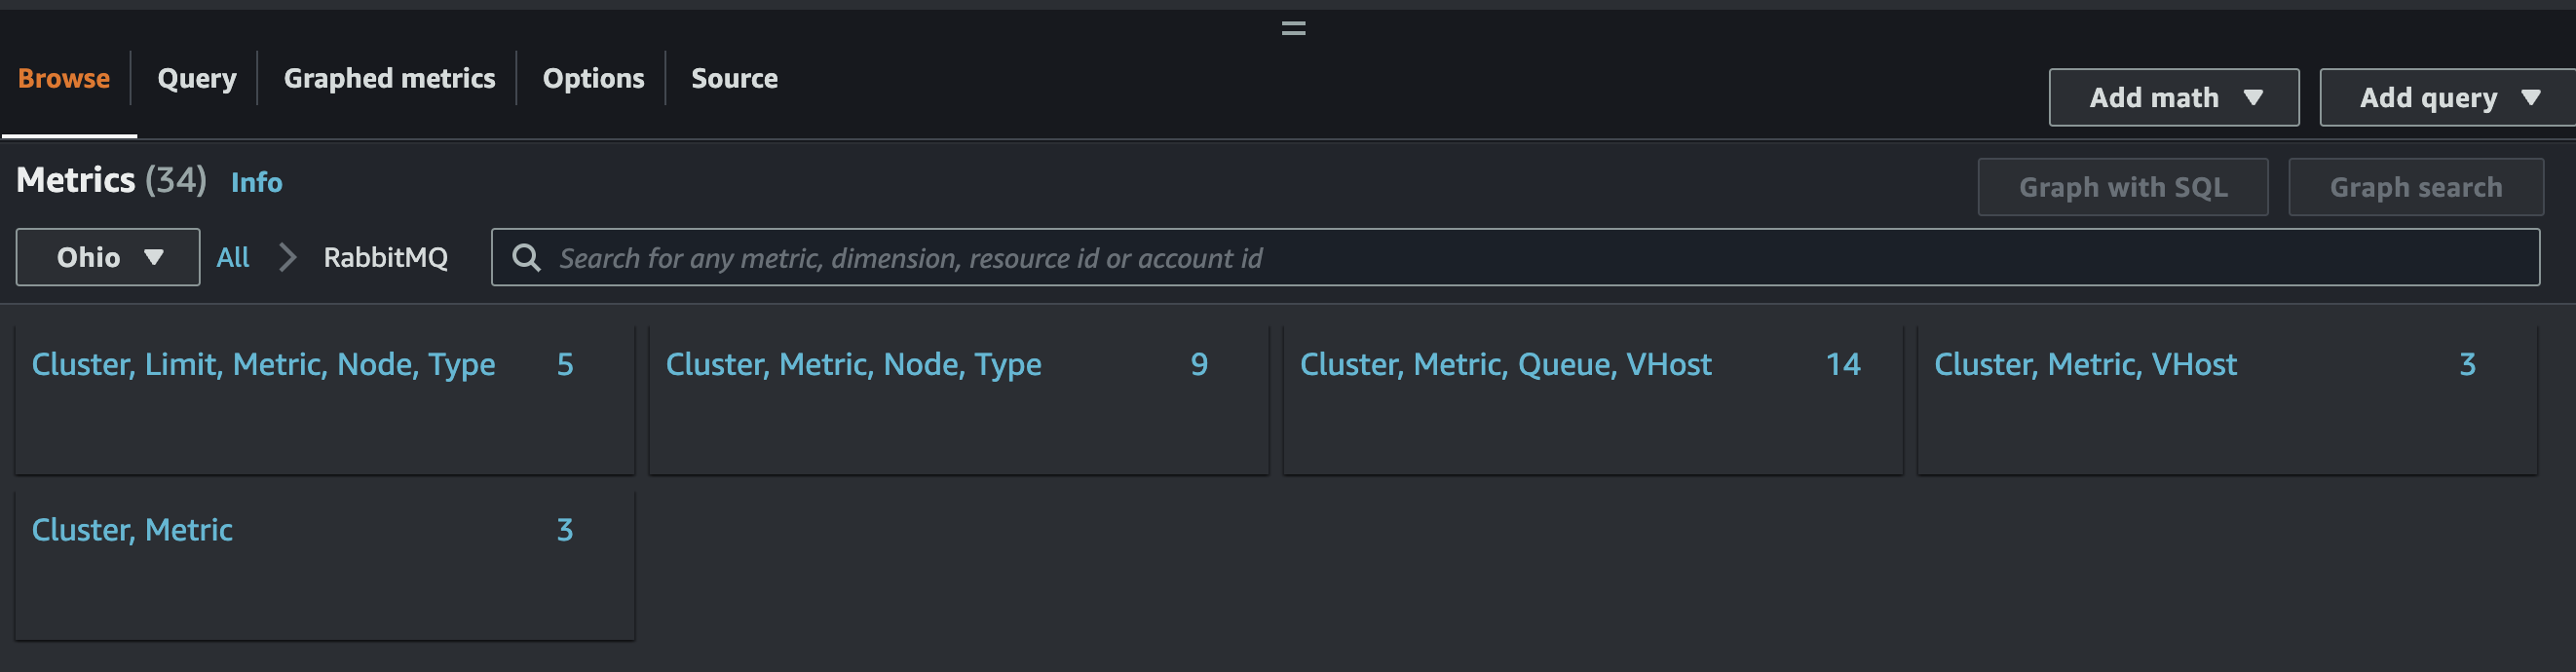
- Take note the Cluster's value and other metric that will be used to specify the dimension for the alert in the next part.
- NOTE: If the metrics doesn't appear on your dashboard, please double check the region you set inside the
rabbitmq.conf
Cloudwatch Setup using Terraform
To have an alert on Cloudwatch metrics, we will need to create a target SNS that then trigger an AWS Lambda whenever there is new entry inside the SNS. AWS Lambda is needed because we need to send the alert to Slack which can't be done directly from SNS.
Create AWS Lambda module
- Before we can create a Lambda service, we will need to allow Lambda to assume the execution role for running, because we the service doesn't use any AWS resources, the policy is simple. Create a folder to store your Lambda module. Then, create a file named
data.tfand add this Policydatato the file
data "aws_iam_policy_document" "lambda_exec_role_policy" {
  statement {
    sid    = "LambdaExecRolePolicy"
    effect = "Allow"
    principals {
      identifiers = [
        "lambda.amazonaws.com",
      ]
      type = "Service"
    }
    actions = [
      "sts:AssumeRole",
    ]
  }
}
- Then, create the execution role from this policy by adding this
resourceinto the fileiam.tf
resource "aws_iam_role" "lambda_exec_role" {
  name               = "NotiLambdaExecRole"
  assume_role_policy = data.aws_iam_policy_document.lambda_exec_role_policy.json
}
- After setting up the role, we then create the source code of the service and put it inside the artifacts folder. Create a new file called
slack_lambda.pyinside a the path/artifacts/lambdawith the content below. This Lambda will send the content inside themsgvariable into Slack, so you can modify this to your liking.
import json
import re
import os
import boto3
import urllib3

# Lambda global variables
region = os.environ["AWS_REGION"]  # from Lambda default envs
slack_url = os.environ["SLACK_URL"]
slack_channel = os.environ["SLACK_CHANNEL"]
slack_user = os.environ["SLACK_USER"]


http = urllib3.PoolManager()


def lambda_handler(event, context):
    url = slack_url
    msg = {
        "channel": slack_channel,
        "username": slack_user,
        "text": event["Records"][0]["Sns"]["Message"],
        "icon_emoji": "",
    }

    encoded_msg = json.dumps(msg).encode("utf-8")
    resp = http.request("POST", url, body=encoded_msg)
    print(
        {
            "message": event["Records"][0]["Sns"]["Message"],
            "status_code": resp.status,
            "response": resp.data,
        }
    )
- Finally, you are now ready to create the Lambda resource. Create a new file called
main.tfand add this into the file
resource "aws_lambda_function" "noti_lambda" {
  function_name    = var.name
  description      = var.description
  filename         = var.artifact_file
  source_code_hash = filebase64sha256(var.artifact_file)
  role             = aws_iam_role.lambda_exec_role.arn
  handler          = var.handler
  runtime          = var.runtime
  memory_size      = var.memory_size
  timeout          = var.timeout

  dynamic "environment" {
    for_each = (length(var.environment) > 0 ? [1] : [])
    content {
      variables = var.environment
    }
  }

  tags = var.tags
}
- To specify which variables, this module will receive, create a file named
variables.tfand paste this into the file. This is to make the module more flexible to variable change.
variable "artifact_file" {
  type        = string
  description = "The path to the function's deployment package within the local filesystem"
  default     = null
}

variable "handler" {
  type        = string
  description = "The function entrypoint in the code."
  default     = "index.handler"
}

variable "memory_size" {
  type        = number
  description = "Amount of memory in MB your Lambda Function can use at runtime."
  default     = 128
}

variable "timeout" {
  type        = number
  description = "The amount of time your Lambda Function has to run in seconds."
  default     = 6
}

variable "description" {
  type        = string
  description = "Description of what the Lambda Function does."
  default     = null
}

variable "environment" {
  type        = map(string)
  description = "The Lambda environment's configuration settings."
  default     = {}
}

variable "tags" {
  description = "A mapping of tags to assign to the module resources."
  type        = map(string)
  default     = {}
}

variable "name" {
  type        = string
  description = "A unique name for the Lambda Function."
}

variable "runtime" {
  type        = string
  description = "The Runtime used in the Lambda Function."
}
- And add the ouputs so that other modules can use this module. Create a file named
outputs.tfand add this
output "name" {
  description = "The name of the Lambda Function."
  value       = aws_lambda_function.noti_lambda.function_name
}

output "arn" {
  description = "The ARN identifying the Lambda Function."
  value       = aws_lambda_function.noti_lambda.arn
}

output "invoke_arn" {
  description = "The ARN to be used for invoking Lambda Function from API Gateway."
  value       = aws_lambda_function.noti_lambda.invoke_arn
}
Create SNS module
- When you already have Lambda module in place, it is now time to create an SNS module that will use this Lambda as the target.
- The initial step is the same as when you create Lambda module, first, create a new folder that will be used to store SNS module.
- For SNS, we will need to create two thing: SNS topic which is like a list of messages and SNS topic subscription which specify the identities that SNS will invokes whenever there are new entries into SNS topic. To do this, add these two resources into
main.tf
resource "aws_sns_topic" "demo_topic" {
  name            = "demo-topic"
  delivery_policy = <<EOF
{
  "http": {
    "defaultHealthyRetryPolicy": {
      "minDelayTarget": 20,
      "maxDelayTarget": 20,
      "numRetries": 3,
      "numMaxDelayRetries": 0,
      "numNoDelayRetries": 0,
      "numMinDelayRetries": 0,
      "backoffFunction": "linear"
    },
    "disableSubscriptionOverrides": false,
    "defaultThrottlePolicy": {
      "maxReceivesPerSecond": 1
    }
  }
}
EOF
}

resource "aws_sns_topic_subscription" "slack-endpoint" {
  endpoint               = var.slack_lambda_arn
  protocol               = "lambda"
  endpoint_auto_confirms = true
  topic_arn              = aws_sns_topic.demo_topic.arn
}
- To be able to trigger Lambda, SNS need to be given permission to do just that. Append this resource into
main.tf
resource "aws_lambda_permission" "slack_lambda_invoke" {
  statement_id  = "sns_slackAllowExecutionFromSNS"
  action        = "lambda:InvokeFunction"
  function_name = var.slack_lambda_arn
  principal     = "sns.amazonaws.com"
  source_arn    = aws_sns_topic.demo_topic.arn
}
- Specify the variables inside
variables.tffile for used when calling this module. As SNS will require the Lambda ARN to specify as a target, this is required.
variable "slack_lambda_arn" {
  description = "The ARN of Slack Notification Lambda function"
}
- Do the same for ouput so this module's ouput which is the SNS topic can be used by other module
output "sns_topic_arn" {
  value = aws_sns_topic.demo_topic.arn
}
Create Cloudwatch Alarm on Metrics
- We are now ready to create the Cloudwatch Alarm when the target SNS module is available.
- Create a folder to store the cloudwatch module, then create a file named
main.tfand add this resource declaration to your file. Remember to change the variable inside the dimensions variable to your custom metric value. Also, you can change variables likeevaluation_periods,period... to your need.
resource "aws_cloudwatch_metric_alarm" "demo-alert" {
  alarm_name          = var.alert_name
  comparison_operator = "GreaterThanOrEqualToThreshold"
  evaluation_periods  = 2
  metric_name         = "Messages"

  namespace                 = "RabbitMQ"
  period                    = 60
  statistic                 = "Sum"
  threshold                 = 3
  alarm_description         = "This metric monitors total number of messages in queue demo_queue"
  alarm_actions             = [var.sns_topic_arn]
  insufficient_data_actions = []
  dimensions                = var.dimensions
  tags = {
    "Label" = "Messages Alert"
  }
}
- Add the variables declaration to be used by the module to file
variables.tf
variable "alert_name" {
  description = "Alert for RabbitMQ's total messages in a queue"
}

variable "sns_topic_arn" {
  description = "ARN of SNS Topic that will receive notification from Cloudwatch Metrics"
}

variable "dimensions" {
  type        = map(string)
  description = "The Cloudwatch metric dimensions"
  default     = {}
}
Apply Terraform modules to AWS
- In the root folder, create a
main.tffile and add all the modules you just created. - NOTE: Please update the
sourcevalue for each module accordingly. Also, please change the value inside thedimensionsto your metric.
provider "aws" {
  region = "us-east-2"
}

data "archive_file" "lambdazip" {
  type        = "zip"
  output_path = "${path.module}/artifacts/slack_lambda.zip"

  source_dir = "${path.module}/artifacts/lambda/"
}

module "slack_lambda" {
  source = "./modules/lambda"

  name          = "slack_lambda"
  description   = "notify slack channel on sns topic"
  artifact_file = "${path.module}/artifacts/slack_lambda.zip"
  handler       = "slack_lambda.lambda_handler"
  runtime       = "python3.8"
  memory_size   = 128
  timeout       = 30
  environment = {
    "SLACK_URL"     = var.slack_url
    "SLACK_CHANNEL" = var.slack_channel
    "SLACK_USER"    = var.slack_user
  }

  tags = {
    Queue = "demo_queue"
  }
}

module "sns_topic" {
  source = "./modules/sns"

  slack_lambda_arn = module.slack_lambda.arn
}

module "cloudwatch-alert" {
  source        = "./modules/cloudwatch_alarm"
  alert_name    = "demo_alert"
  sns_topic_arn = module.sns_topic.sns_topic_arn
  dimensions = {
    Queue   = "demo_queue"
    Metric  = "Queue"
    VHost   = "/"
    Cluster = "rabbit@ip-172-31-4-62.us-east-2.compute.internal"
  }
}
- And create
variables.tfthat store variables used for this
variable "slack_url" {
  description = "slack hook url, eg. https://hooks.slack.com/services/xxxxxxxxxxxxx"
  type        = string
}
variable "slack_channel" {
  description = "slack channel, eg. #mychannel"
  type        = string
}
variable "slack_user" {
  description = "slack user"
  type        = string
}
- To set the value of variables without hardcoding straight into file, you can create a new environment variable with the prefix
TF_VAR_along with the variable. For example, this is to exportslack_urlexport TF_VAR_slack_url=https://hooks.slack.com/services/xxxxxxxxxxxxx - When you are done setting value for three variables above, run
terraform initto download the AWS plugins, thenterraform planto check andterraform applyto apply the change to AWS.
Run an alert check
- If after running
terraform applysuccessfully and there is an alert in your Cloudwatch Alert dashboard, congratulation you are almost done.
- Then, try to benchmark to trigger the alert, there should be an alert sent to your Slack, the content depends on the value of variable
msgin the former part.
Ending
- Check out the link to the Terraform's source code above if you don't want to copy and paste all over the place. https://github.com/digsh0t/rabbitmq_cloudwatch_alert_demo
- You are now be able to create a Cloudwatch Alert that listen to RabbitMQ's metric and send a message to Slack whenever an alert is reached.
- If you want to be able to create multiple alerts, simply duplicate the
cloudwatch-alertmodule with the new metric's configuration. - If you only do this for demonstration, don't forget to run
terraform destroyto remove everything. - And lastly, really thank you for reading till this part. My English is trashy but the fact that you can read this means you took your time deciphering it. Appreciated!